How to Run a Facebook Birthday Discount Ad

Want to learn how to run a Facebook birthday discount ad?
It's an easy campaign to set up on your Facebook business page.
You can set up a continuous birthday ad to run all year long or create one specifically for the current month.
Let's get into it.
How to Run a Facebook Birthday Discount Ad
- Disable your ad blocker, and open your account at business.facebook.com.
- Click Create Ad.
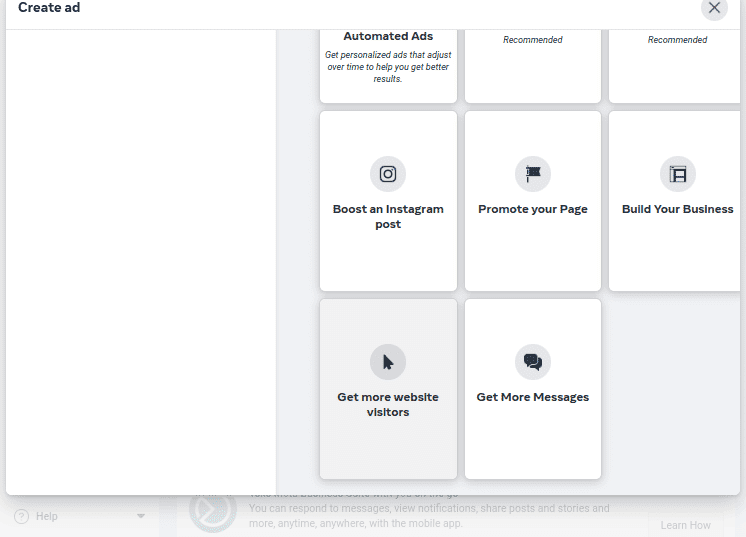
- Select Choose a goal: Create a new ad from scratch, then choose Get more website visitors as a goal.
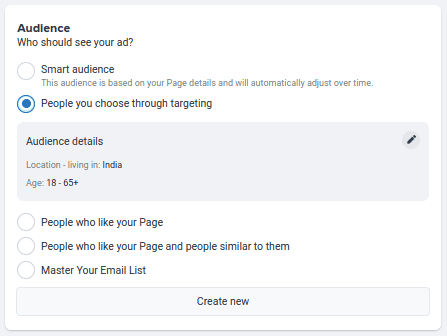
- Under Audience, select People you choose through targeting, then click the pencil button to edit your target audience.
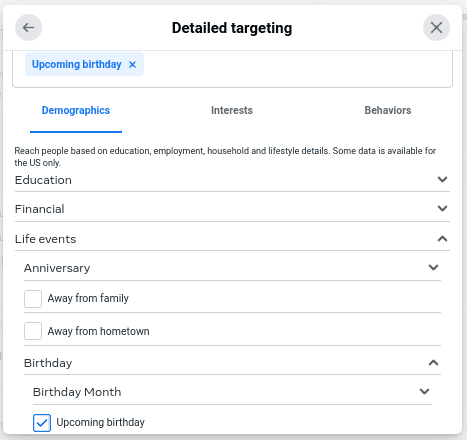
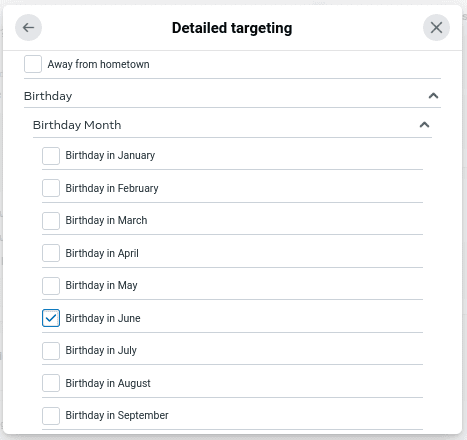
- Click Browse under Detailed targeting → Life events → Birthday.
- Choose Upcoming Birthday if you want to run a Facebook birthday discount ad continuously. Otherwise, click Birthday Month to select the current month.
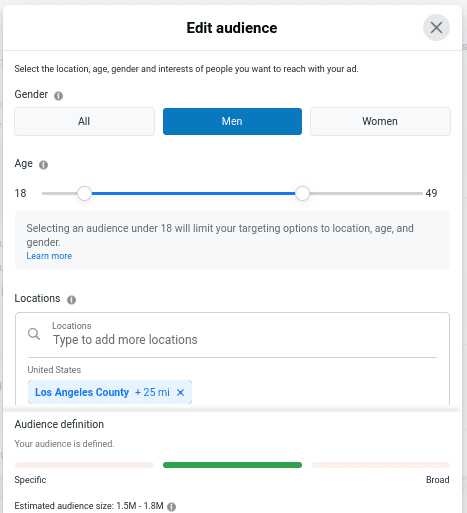
- Click the back button, then edit the rest of your target audience by location, age and gender.
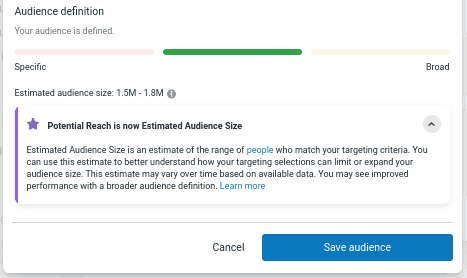
- Click Save Audience.
- Configure the rest of your campaign, then click Promote Now to launch immediately, or schedule the campaign for later.
And now, for a more detailed version of these instructions.
Step 1: Create a Facebook Ad
Start by disabling your ad blocker for business.facebook.com if you use one on your browser.
Facebook displays a preview of your ad as you create it. Your ad blocker may cause issues for Facebook's advertising tools because of this, so it's best to disable it while you use them.
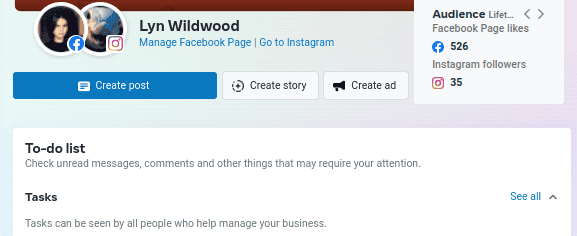
Next, go to business.facebook.com, and sign into the account that runs your Facebook business page.
This should bring you to the Meta Business Suite dashboard.
Click the Create ad button located toward the top of the page. It's next to the Create post and Create story buttons.
Alternatively, select Ads from the left-hand side menu, then click Create ad.
Step 2: Choose a Goal
The Facebook advertising dashboard appears as a modal window no matter which route you use to get there.
Select Choose a goal from the options to the left if it's not selected by default.
This allows you to choose a specific goal. For the purpose of a Facebook birthday discount ad, choose Get more website visitors as a goal.
Your primary objective with a birthday discount is to encourage customers who are familiar with your brand to finally take action.
A discount specifically tailored for them is the perfect way to encourage them to make a purchase. Having them visit your website is the first step in getting them to that end goal.
Step 3: Define Your Target Audience by Birthday
Scroll down to the Audience section, and select People you choose through targeting.
Then, click the pencil icon located nearby to edit your audience. This is how we'll target consumers by birthday.
Scroll down to Detailed targeting, and click the Browse button located there.
The Demographics section should be selected by default. Select it if it's not.
Click Life events to reveal the dropdown menu for this option. This reveals a Birthday option.
If you plan on running a continuous ad, check the box for Upcoming birthday.
Here's how this approach works. Let's say it's June. You launch the ad today, and leave it running nonstop for the rest of the year.
The ad will display to Facebook users with June birthdays during the month of June, July birthdays during the month of July, August birthdays during the month of August, and so on and so forth.
You can choose a daily budget so you never over spend. You can also stop the ad or change your daily budget whenever you want. This makes it a great ad campaign to run.
If you only want to run your ad during the current month, click the Birthday Month option to reveal another dropdown menu, then check the box for the current month.
You can add more demographics, interests and user behaviors to target, if you wish. For example, if you own a gym, you may wish to target Facebook users interested in fitness or weight training.
Click the back button when you're done.
Step 4: Define Target Audience by Age, Location and Gender
Facebook allows you to target ads by age, location and gender to control who sees them.
This approach helps you increase your conversions as you aren't targeting a broad group.
Hopefully, you know your target market by now and who's within it. Now's your chance to select them.
Choose which gender(s), age range and location to target.
If you're a local business, enter the counties you serve.
As you make these changes, Facebook will score your target audience on a scale of Specific to Broad. Try to stay within the center of this scale where the line is green.
Click Save Audience when you're done.
Step 5: Add Your Assets
You can use images and videos you've already uploaded to your Facebook page, but your ad will be much more effective if you create a dedicated image for it.
The easiest way to create a Facebook ad image is with Canva.
Canva is a graphic design tool that's intuitive and easy for non-designers to pick up.
More importantly, they have templates you can use to create a Facebook ad in minutes.
Start by creating an account, then log in to the site's main dashboard.
Click Social media under What will you design?, then switch over to the Facebook tab.
Select Facebook Ad. This will open the design interface in a dimension optimized for Facebook's ad requirements.
Enter "coupon," "discount" or "birthday" in the search box to find a template you'd like to work with.
The beauty of Canva is the way it breaks templates down into multiple elements so you can change and customize everything.
Don't like the shopping cart icon in the discount template you chose? Switch it out for a dumbbell.
The ad template you chose doesn't mention a birthday? Change the text or add a new text element!
Once your ad design is complete, save it as a PNG image, and name it accordingly.
Adding Your Newly Created Asset to Your Facebook Ad
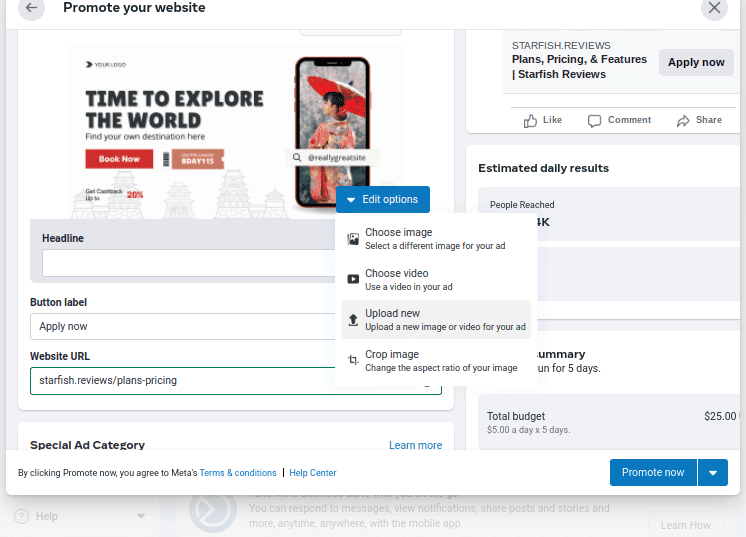
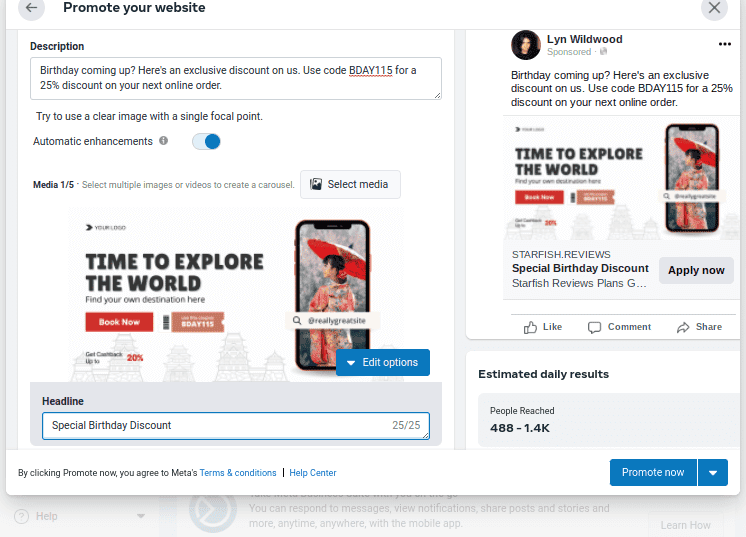
Back in Facebook, click Edit options, then Upload new, and upload the birthday discount ad image you created.
Step 6: Include a Marketing Message
Use the Description field to include a marketing message that will entice customers.
Something as simple as this will do:
"Birthday coming up? Here's an exclusive discount on us. Use code BDAY115 for a 25% discount on your next online order."
You'll need to add the coupon code to your online ordering system or set up a way for customers to redeem your offer in person, like this:
"Birthday coming up? Here's an exclusive discount on us. Just show us your ID on the day of. We'll apply a 25% discount to your order."
Add a headline as well, something along the lines of "Special Birthday Discount". You only have 25 characters to work with, unfortunately.
Step 7: Choose a Target Destination
Enter the URL for the part of your website you're promoting in the Website URL field.
This could be your homepage, your Shop page, your Menu page, your Booking page, a specific product page, etc.
This is required, so input something even if customers will use your discount in person.
Then, choose a button label.
If you're having a hard time getting the dropdown menu for the Button label to scroll, use your arrow keys instead.
Choose something that matches your business type and the way customers will take advantage of your offer.
Step 8: Define a Duration for Your Campaign
Scroll down to the Schedule and duration section.
Here's where you can define the type of ad you're running.
Choose Run this ad continuously if you chose Upcoming birthday.
Otherwise, click the End date field to choose when the ad should end.
Choose a Start date as well.
Step 9: Set a Daily Budget
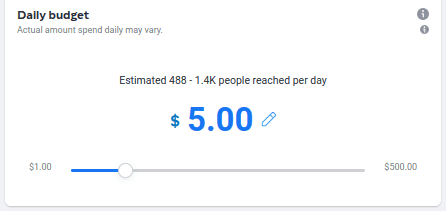
Define the amount you want to spend on your Facebook birthday discount ad for each day that you run it.
Facebook calls this a daily budget, but it actually defines your budget for the entire week.
As Facebook explains:
"Your charges will average out over a calendar week (Sunday to Saturday). That means for every week ending Saturday at midnight, you won’t spend more than 7 times your daily budget."
So, if your daily budget is $5, you may spend $7 one day but only $3.50 the next.
However, since Facebook states "you won't spend more than 7 times your daily budget," you won't spend more than $35 in a week if you set your daily budget to $5.
The platform spends more on some days of the week as a way to deliver your ads as effectively as possible.
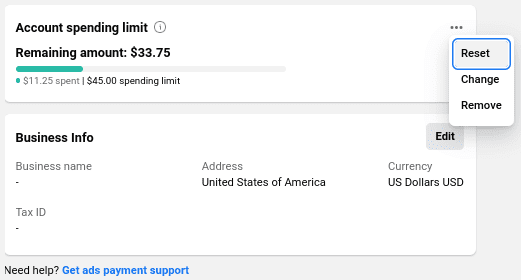
You can also define an account spending limit to ensure you never go over budget, ever. This is especially useful if you use multiple continuous ads.
This limit never changes or resets until you do so yourself.
Follow these steps to set it: Meta Business Suite dashboard → Settings → Ad account settings → Payment settings → click the three-dot menu to change, reset or remove your account spending limit.
But what should your daily budget be? There is a technical way to figure this out, but we'll talk about that later. Scroll down a little to find an explanation on that.
If you don't want to take the time (or do the math) to figure this out, enter the minimum amount you're willing to spend each day.
You can monitor your performance after a few days and make changes accordingly.
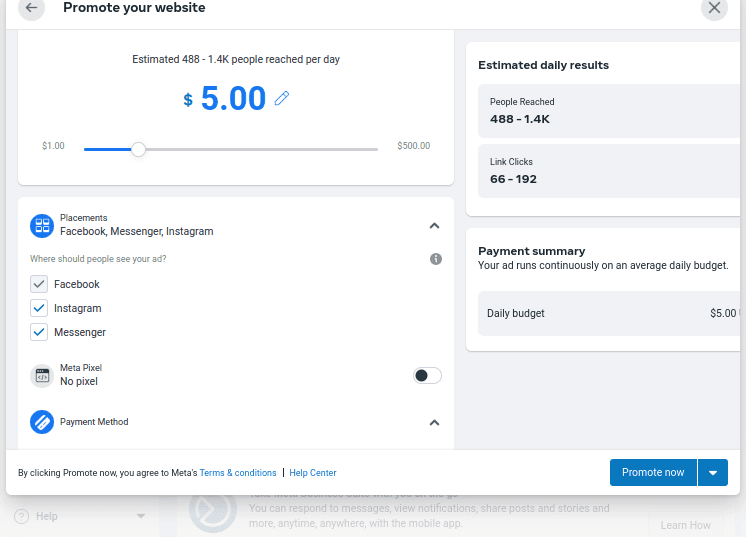
You'll see an estimate of the amount of people Facebook expects your ad to reach as well as the number of link clicks you'll receive for your chosen daily budget to the right.
Step 10: Launch Your Ad
Open the Placements section to control where Facebook displays your birthday discount ad.
Facebook selects Facebook, Instagram and Messenger by default.
Experiment by deselecting Instagram and Messenger one by one. My estimates increased when I deselected Instagram, for example.
You should also enable the Pixel option.
Facebook Pixel (now called Meta Pixel) is a snippet of code you add to your website to connect it to your Facebook business account.
When you enable this for ads, Facebook will log actions customers take after clicking on them.
Think of it like Google Analytics for Facebook Ads.
You can also use Pixel to retarget customers who've already visited your website.
To use Facebook Pixel, create a Pixel, and add the code to your WordPress site's header with a plugin like Insert Headers and Footers.
Add a payment method as well.
Lastly, choose how you want to launch your ad:
- Promote Now - Launch the ad immediately.
- Schedule - Choose when to launch the ad if you didn't specify a Start date earlier.
With the Schedule option, you can create a different Facebook birthday discount ad for every month out of the year rather than running a continuous ad.
This allows you to optimize your visuals and marketing messages for seasonal and holiday events.
How to Calculate a Facebook Advertising Budget
Hopefully, you have a business plan that defines how much you need to make to check off your business wishlist and achieve your goals.
This plan should include the amount of revenue you need to add to your monthly recurring revenue (MRR) in order to achieve those goals.
This is the amount you should strive to earn from Facebook ads in 30 days. We'll call it your "sales goal."
So, how much do you need to spend on Facebook ads in order to achieve that goal?
It involves the following process:
- Step 1: Determine the number of sales you need to meet your sales goal.
- Step 2: Determine the number of ad clicks you need to acquire that many sales.
- Step 3: Use your data to determine the Facebook advertising budget you need to achieve your sales goal.
Step 1: Number of Sales Needed
Let's say you want to add $5,000 in sales to your MRR. Your sales goal is $5,000.
All you need to do is divide your sales goal by the average amount of revenue you earn per customer/sale/order.
To determine this amount, simply add up the amount of revenue you earned from sales in a given timeframe, such as 30 days, 60 days, 12 months, etc. We'll call this Figure A.
Then, add up the total number of customers/sales/orders you had in that same timeframe. We'll call this Figure B.
Finally, divide Figure A by Figure B.
Let's say our example business earned $55,100 in a month from 500 orders. Our business earned an average of $110.20 per order since 55,100 ÷ 500 is 110.20.
Since our sales goal is $5,000 and we earn an average of $110.20 per order, we need 45.37 additional orders per month to meet our sales goal since 5,000 ÷ 110.20 is 45.37.
Step 2: Number of Ad Clicks Needed
You need your conversion rate for this calculation.
This is simple: divide the number of customers/sales/orders you had by the number of website visitors you had.
This will result in a funky number, but all we need are the whole number plus the first four numbers after the decimal point.
So, if you had 14,000 website visitors and 500 sales, your conversion rate is 0.0357 since 500 ÷ 14,000 is 0.0357.
Note: Move the decimal point two spots to the right to turn your conversion rate into a percentage, if you wish. So, 0.0357 becomes 3.57%.
Now, divide the number of sales you need by your conversion rate.
This is 1,270.87 in our example since 45.37 ÷ 0.0357 is 1,270.87.
We need 1,270.87 ad clicks to meet our sales goal of $5,000.
Step 3: Calculate Your Facebook Advertising Budget
To calculate this, we just need to multiply the number of ad clicks we need by your average cost per click (CPC).
The average CPC for Facebook Ads was $0.82 in 2021, according to AdEspresso's data.
You can use this number, but consider running your own ads for about a week to determine your own CPC.
So, to achieve our sales goal of $5,000 in added revenue per month, we need to spend $1,042.11 on Facebook Ads every month since 1,270.87 ad clicks × $0.82 is $1,042.11.
That's a 379.80% return on investment.
You don't need to dedicate this entire budget to your Facebook birthday discount ad.
Spread it across multiple ad campaigns instead.
Why Should You Run a Facebook Birthday Discount Ad?
Birthday discounts are nothing new. Businesses have been using them for decades to try and encourage customers to return sooner than they planned.
They work because they feel more personal and exclusive than discounts available to all customers.
Plus, because that discount is only available for a limited time, it encourages customers to act since they don't have much time to.
Finally, it gives you a chance to offer discounts without giving away too many or overwhelming your staff and inventory with an influx of customers.
When you add Pixel to these ads, you also get to utilize a powerful form of advertising called retargeting.
Retargeting involves displaying ads to customers who are already familiar with your brand.
Customers may not convert the first time they visit your website. You can use Pixel-enabled ads to retarget them on the platform.
A special birthday discount popping up on Facebook may just be that extra bit of encouragement they need.
Other Types of Facebook Ads You Can Run with Retargeting in Mind
There are a number of additional campaigns you can run with retargeting in mind.
Use Facebook Custom Audiences to target customers who:
- viewed your video ad for a specified duration.
- viewed a specific product. You can create an ad specifically for that individual product.
- abandoned carts.
- are inactive in your email list.
- viewed the Upgrade page in your app but did not convert.
- did not convert from your first ad.
Check out our guides on managing Facebook Reviews and adding them to your website as well:

