Importing Reviews - Creating Profiles
A Profile tells Starfish where to import your reviews from. Starfish can import reviews from the following review sites:
- Agoda
- Avvo
- Expedia
- Google Playstore
- TripAdvisor
- Trustpilot
- Yelp
- Zillow
- Zomato
Each Profile contains information about the 3rd party review site we will import from. Profile information is used to scrape the reviews. After we retrieve the reviews, they are added to your Starfish account. The Profile Name is displayed next to each imported review.
- First, click Starfish Reviews > Profiles

- Then click Add New.

- Enter a Profile name.
This can be any profile name you choose but should be something that identifies where the reviews are coming from.
- Click Choose a Reviews Site and select one of the review sites from the drop-down list. We support Agoda, Avvo, Expedia, Facebook, Google, Google Playstore, TripAdvisor, Trustpilot, Yelp, Zillow, and Zomato. If you do not see a site you want to import reviews from, please contact us. We may be able to incorporate it into a future version of Starfish.
- Once you enter the Slug, the review site’s URL is built and displayed for verification.
- Now select either Active or Disabled. If the profile is disabled, it will not run any import process.
- Lastly, select the Scrape for Review Now? option. If this option is selected, the import will be queued and run. If there are any other imports running, this will follow when the prior one is complete.
The schedule that the review import process is run can be set in the Starfish Settings. Go to Starfish Reviews > Settings > Reviews.
 The schedule can be set to run Daily, Weekly, or Monthly,
 - The Profile page provides the status of each import. At a glance, you can see the Visibility, Status, Scrape Status, Last Scrape, Review Count, and the Average Rating of the imported reviews. Hovering the mouse over the profile, you will see a Details link. Clicking Details opens the profile where you can make changes to the profile settings or force an import to begin instead of waiting for the next process time.
A profile status of Expired means that the last import or scrape occurred over 30 days ago. In this case, the last import that was attempted failed. An import for this profile must be manually run to reactivate it.


Every profile requires a Profile Slug. It is part of the review site’s URL. It is the part that identifies your account/profile on that review site. The Slug usually follows the .com site name.
Example:
Our Facebook page URL is https://www.facebook.com/StarfishWP.
The Profile Slug is StarfishWP.
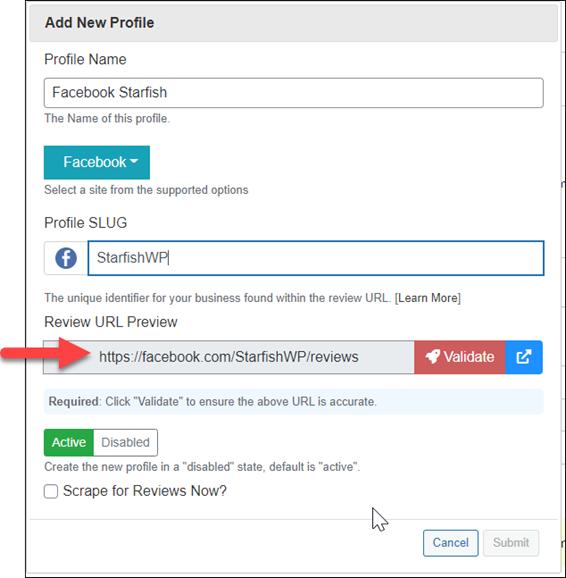
Click Validate to confirm the URL is correct. Starfish will ping the URL to ensure it is valid. Once validated, the validate button will turn into a green check.
Note: You can click the Blue arrow icon to troubleshoot if the URL is not validated. The URL will open in a new tab, and you can see what the problem might be.
 The schedule can be set to run Daily, Weekly, or Monthly,